Multiple Linked Clones using pyVmomi

This is another post on  pyVmomi, which helps to automate  vSphere operations using python . In this post I am sharing a script to create multiple linked clones.  In previous post we discussed about how to get started with pyVmomi .

Using vSphere UI ( C# and Web Client) , linked clones cannot be created. Linked clone creation is only possible through API. The script mentioned in this blog can create multiple linked clones from an existing source VM.

The script is available @ https://github.com/linked_clone.py

The script is invoked as below

root@virtual-wires:~# python linked_clone.py -u <VC Username>  -p <VC_password>  -v <VC IP> -d <ESX_IP> –datastore <Datastore_name> –num_vms <Number of linked clone to be created>  –vm_name <Source VM name>

Following are the different steps the script will do.

1. Validates the input parameters.

  • Check for source VM
  • Check for Destination datastore
  • Check for Destination Host
  • Check for support of snapshot on the source VM

2.Verifies the requirement for Linked clone

  • Creates snapshot
  • Checks the source VM datastore has access to destination ESX
  • Creates the clone and relocate spec

3. Actual operations

  • Takes  snapshot on the Source VM
  • Spawns the clone task
  • Treats each clone as a thread and monitors the progress

One of the learning as part of this script was the use of threading module in python. It helps to invoke multiple clones and allows ability to track each threads task status.

  for vms in range(0, opts.numvm):
      t = threading.Thread(target=linkedvm,args=(child, vmfolder, vms, clone_spec))
      t.start()

In the above code, ‘target’ is the function which will be executed and ‘args’ are parameters to that function. This way we create a thread object ‘t’ and this start the thread using t.start().

Hope this will help to deploy multiple linked clones  using pyVmomi.

Using pyVmomi to collect ESXi info

I have been using PowerCLI to automate multiple vSphere  tasks . PowerCLI is very powerful for admin tasks and in majority of the cases powerCLI gets the work done in automated fashion. But I always wanted to experiment with the a language specific SDK for vSphere. VMware release multiple language specific SDK’s ( Perl, python, Java, .net etc) and I decided to experiment with Python SDK’s.

What’s pyVmomi

As we know that vSphere management operations are accessible/exposed through webservice API’s . Using interfaces like Managed Object Browser( MOB) we can do same operations which we typically do through UI. Similarly using python client stubs we can interact with the managed objects exposed by the vSphere platform. pyVmomi is the client side interface which allows python programs/scripts to connect to VC/ESX and help to manage/invoke methods. More details about vSphere managed objects and data objects are available in the vSphere API documentation.

How to write first python program : Collect ESXi hardware information

Following 3 steps are minimum ( and maximum) required to get started on pyVmomi ( on either windows or linux machine)

  1. Install Python
  2. Install pip
  3. Install pyVmomi  ( using pip install pyvmomi)

Thats all. Now we are ready to write our first script.The exact same steps and more details are available at http://vmware.github.io/pyvmomi-community-samples/#getting-started

Now that we have the required client software installed, lets try to connect to an ESXi server and collect the hardware information.
Below is a sample code , which is available at the git repo at this link also. There are easier way to get into the hostobject, rather than going through different layers ( such as content.searchIndex.FindByIP), but to begin with, we will traverse through the complete layer. The detailed object model hierarchy is available @ this link

from pyVmomi import vim
from pyVim.connect import SmartConnect, Disconnect
import argparse
import atexit

def validate_options():
    parser = argparse.ArgumentParser(description='Input parameters')
    parser.add_argument('-s', '--source_host',dest='shost',
                         help='The ESXi source host IP')
    parser.add_argument('-u', '--username',dest='username',
                         help='The ESXi username')
    parser.add_argument('-p', '--password',dest='password',
                         help='The ESXi host password')
    args=parser.parse_args()
    return args

def main():
    opts=validate_options()
    si = SmartConnect(host=opts.shost,user=opts.username,pwd=opts.password )
    atexit.register(Disconnect, si)
    content=si.RetrieveContent()
    hostid=si.content.rootFolder.childEntity[0].hostFolder.childEntity[0].host[0]
    hardware=hostid.hardware
    cpuobj=hardware.cpuPkg[0]
    print 'The CPU vendor is %s and the model is %s'  %(cpuobj.vendor,cpuobj.description)
    systemInfo=hardware.systemInfo
    print 'The server hardware is %s %s' %(systemInfo.vendor,systemInfo.model)
    memoryInfo=hardware.memorySize
    print 'The memory size is %d GB' %((memoryInfo)/(1024*1024*1024))

if __name__ == '__main__':
    main()

To invoke the script use “python <script_name> -s <host_IP> -u <username> -p <password>”.

The output will be like below :

root@host1:~# python test.py -s '10.11.1.150' -u 'root' -p '<password>'
The CPU vendor is amd and the model is AMD Opteron(TM) Processor 6272.
The server hardware is HP ProLiant DL385 G7.
The memory size is 31 GB.

I will follow up with another script on how to create multiple linked-Clones using pyVmomi.


Collecting ESX Network Statistics

The requirement was simple. Capture the network packets transmitted ( rx/tx) through the NICs in every 10 seconds for 1 hour.  Its quite simple..right…. Well,  it turned out to be difficult as I could not find any easy way to capture this information.

Why not esxtop:

Untitled

esxtop is a great tool to view esxi stats. It provides the required functionality of showing packets transmitted per second. esxtop allows storing the data in .csv format too. This link provides detailed information on how to use esxtop to dump stats from esxi. So I was planning to use esxtop, but then got stuck using the regular expressions to extract the required data.

Get the data from the source:

I was aware that majority of the data ( or probably the complete data) for esxtop is coming from vsish. So , why dont I take the required data directly from vsish. BTW, there is a good article to know about vsish at this blog. I was able to go to the specific node under vsish , but was not sure how to capture these values in regular interval .  Little bit of searching of various small scripts inside ESXi showed that there is a python module imported in some of the scripts called ‘vmware.vsi’.

>> import vmware.vsi as vsi
>>> print dir(vsi)
['__all__', '__builtins__', '__doc__', '__file__', '__name__', '__package__', '__path__','get', 'list', 'set', 'useCacheFile']

As we can see, there is a “get” and “set” method which can be used to get all the vsish nodes and the values.  For example, to collect the machines CPU configuration, we can use

>>> vsi.get('/hardware/cpu/cpuModelName')
'Intel(R) Xeon(R) CPU E5-2680 v3 @ 2.50GHz'

So, coming back to the original requirement, I wanted to collect the number of packets received and sent in every 10 seconds from all the Network card from the machine. Using the vsi module ,  a python script was written which captures the network packets.  The same script can be downloaded from the GIT repository here

import vmware.vsi as vsi
import time
from collections import defaultdict

def calculate(xyz,nics):
        if xyz[0] == 0 and xyz[1] == 0:
                print "Lets wait for packets to come to %s" %(nics)
        else:
                print "The number of packets received for %s in the last 10 seconds are " %(nics.upper())+ str(xyz[2]-xyz[0])
                print "The number of packets sent from %s in the last 10 seconds are " %(nics.upper())+ str(xyz[3]-xyz[1])


vmnics = defaultdict(list)
no_nics=vsi.list('/net/pNics/')
print "There are total of %d network cards in the machine " %(len(no_nics))
for i in no_nics:
        vmnics[i]=[0,0]
while True:
        for nics in no_nics:
                ReceivePackets=vsi.get('/net/pNics/%s/stats' % nics)['rxpkt']
                vmnics[nics].append(ReceivePackets)
                SendPackets=vsi.get('/net/pNics/%s/stats' % nics)['txpkt']
                vmnics[nics].append(SendPackets)
                calculate(vmnics[nics],nics)
                del vmnics[nics][0:2]
        print "-"*20 +  "Sleeping for 10 seconds" + "-"*20
        print 2*'\n'
        time.sleep(10)

Make sure to indent the script appropriately ( wordpress do not give a good code editor for free !!)

Output from the script:

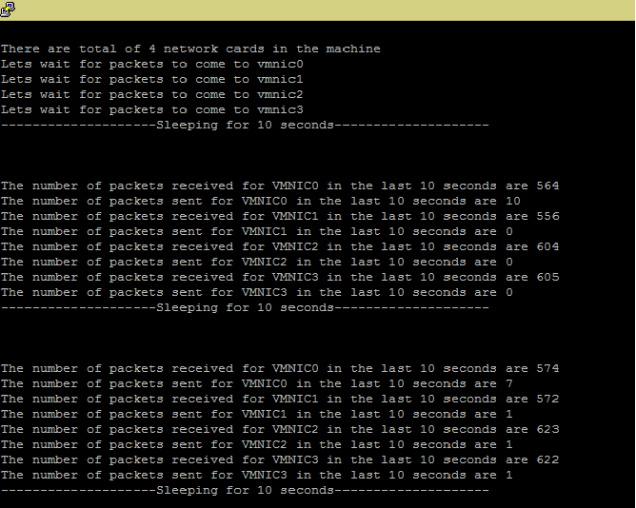
When the script is run on the ESXi host, the output is as below

Untitled1

As we can see from the above script, it captures the network stats from the vsish node through /net/pNics/%s/stats . The values captured stored into a list , print them and then delete values from the list. The script runs in a while loop , so interrupt it with Ctrl+c whenever needed. The script can be copied into ESXi host and run directly through the ssh shell.  The script can be modified as required to capture any other statistics such as Storage traffics.

ESXi Software Image Database

While I was trying to list the VIBs installed on my esxi, got following error

[root@vwires.com:/var/db/esximg/profiles] esxcli software vib list
 [DatabaseIOError]
 Failed to create empty Database directory: [Errno 17] File exists: 'vibs'
 Please refer to the log file for more details.
[root@vwires.com:/var/db/esximg/profiles]

The error message was not clear. The message said, File exists: ‘vibs’. But I haven’t created any file with name ‘vibs’. This  error message prompted me to think about what is “empty Database directory” shown in the error message.

Where is Software Database Directory

With some search and experiments, it was observed that, the esx software information is kept in following places

  • /bootbank/imgdb.tgz
  • /var/db/esximg
  • /locker/packages/var/db/locker/

By looking into the logs in /var/log/esxupdate, I could find a specific error related to /var/db/esximg directory

esxupdate: HostImage: INFO: Installer <class 'vmware.esximage.Installer.LiveImageInstaller.LiveImageInstaller'> was not initiated - reason: 
Could not parse Vib xml from database /var/db/esximg: (None, 'Could not parse VIB XML data: None.')

The above specific error was coming because of the presence of a file in /var/db/esximage/profiles directory. I had accidentally placed a script in this directory and the “esxcli  software vib list” command fails to parse the xml information from that directory.

[root@vwires.com:/var/db/esximg/profiles] ls -lrt
total 24
-r--r--r--    1 root     root         18827 Mar  1 10:56 %28Updated%29%20ESXi-5.5.0-20140302001-standard-1115286101
-rw-r--r--    1 root     root            35 Apr 22 09:56 a.py
[root@vwires.com:/var/db/esximg/profiles]

When I removed the file from the /var/db/esximg directory, the error disappeared and the command worked fine.

This made me to find out how esxcli software vib list command is working and from where it is fetching the information.  Below section can corrupt your machine’s patchDB, so do it with caution.

Display your own VIB information

[root@vwires.com:/var/db/esximg/vibs] esxcli software vib list |grep -i emulex
emulex-esx-elxnetcli           10.2.309.6v-0.0.2494585               VMware   VMwareCertified   2016-03-01

Now go to /var/db/esximg/vibs directory and copy emulex-esx-elxnetcli–20239152.xml to emulex-esx-vwires–20239152.xml

[root@vwires.com:/var/db/esximg/vibs] cp emulex-esx-elxnetcli--20239152.xml emulex-esx-vwires--20239152.xml

Open the newly created emulex-esx-vwires–20239152.xml using vi editor and modify the <name> property to whatever name you like such as ’emulex-this-is-test-vib’

[root@vwires.com:/var/db/esximg/vibs] esxcli software vib list |grep -i emulex
emulex-esx-elxnetcli           10.2.309.6v-0.0.2494585               VMware   VMwareCertified   2016-03-01
emulex-this-is-test-vib        10.2.309.6v-0.0.2494585               VMware   VMwareCertified   2016-03-01
[root@vwires.com:/var/db/esximg/vibs]

The above output shows that, esxcli software vib list command parses all xml’s inside /var/db/esximg/vibs directory and displays values from certain tags from these xmls.


VSAN Caching – Hybrid vs All Flash

With the release of VSAN 6.2,  VMware is ready to enter into the enterprise storage market with full functionality. Dedupe, Raid, Checksum features in addition to existing stretch cluster, ROBO, All Flash, RAID 0/1 , Native Snapshot functionalities makes VSAN a true competitor to all existing  storage arrays.

While reading about the new functionalities of VSAN 6.2, it was observed that most of the new features work only on All flash configuration. VMware documentation on VSAN   mentioned that All Flash will not have cache functionality for Read I/O’s .Why …?

Why to  Cache IOs

Caching of I/O ( both Read and Write) helps to avoid the costly lookup’s to the underlying disks. In case of VSAN the SSD disk selected as ‘cache tier’ act as the caching layer which helps to provide the data directly to the VM without allowing the I/O to go to the underlying disk. But , in the case of all Flash disk group, all disks in the disk group are SSD disks. In case of SSD, the latency for I/O is extremely low compared to magnetic disk.    SSD’s  IOPS are measured in terms of thousands and magnetic disks IOPS are measured in hundreds.  Because of this, there wont be any noticeable latency when reads done from SSD’s in ‘capacity tier’. Hence   there is no need to specifically cache the IO’s in the case of All Flash VSAN.  Reads can directly go into the underlying SSD’s in ‘capacity’ tier .

Then why Cache Tier in All Flash..?

If the $/IOPS is too low in All flash, then why we need to configure Cache Tier during VSAN All Flash configuration. Well, that’s for a different purpose. Magnetic disks are described in terms of RPM and protocols ( SAS/SATA ) , SSD’s are described in terms of DWPD , TBW , MLC, SLC etc.  These terminologies determine the endurance of the SSD disks. SSD’s  ability to withstand writes depends on the underlying nature of the NAND flash.  In a nut shell, the SSD disk wears off based on the write I/O happening on the disk. In order to protect the underlying  capacity tier SSD’s  , write cache is enabled, so that majority of the writes are cached in the cache tier and only limited  writes are redirected to the Capacity Tier. Because of this reason, VSAN All Flash deployment will include High endurance SSD disk  as ‘cache tier’ and low endurance SSD disk as ‘capacity tier’.  The ‘elevator algorithm’ of VSAN make sure that cache destaging to capacity disk are done in such as way that writes are more sequential in nature. Sequential I/O allows significantly higher DWPD /TBW which increases the endurance level of the SSD.

In summary, the All Flash VSAN provides 100% write cache whereas the Hybrid VSAN provides 70% read cache and 30% write cache.  With the latest SSD release from Micron and Sandisk, the price of SSD’s are decreasing drastically which should eventually increase the VSAN All Flash adoption .